Thursday, July 30, 2015

Comment forcer la mise à jour vers windows 10

Nouvelle icône (logo windows) dans la barre des tâches

Comme beaucoup d'entre vous l'ont remarqué (utilisateurs disposant de Windows 7, 8 ou 8.1), une icône est apparue récemment dans la barre des tâches. Celle-ci vous invite à recevoir gratuitement la mise à jour vers Windows 10. 

La date de sortie officielle est le 29 juillet 2015 mais Windows a annoncé le déploiement de la mise à jour par vagues. Alors, comme beaucoup d'entre vous si vous lisez ceci, je m'impatientais car, bien que nous soyions déjà le 30 juillet, je voyais toujours l'écran ci-dessous m'invitant à patienter.


La fenêtre "Ok, prévenez-moi quand l'opération est terminée"

J'ai donc décidé de chercher comment forcer cette fameuse mise à jour et j'ai trouvé ;)
Alors, voici...

Comment faire pour forcer le téléchargement de la mise à jour vers Windows 10.

(Veillez par précaution à prendre une sauvegarde de vos données avant cette procédure)

  1. Ouvrez le dossier C:\Windows\SoftwareDistribution\Download (remplacez le C: par la lettre du disque où Windows est installé) et effacez le contenu de ce dossier.
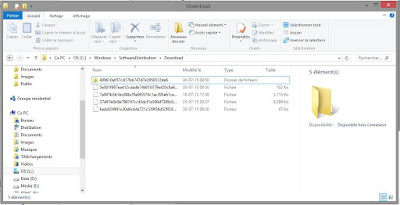
  2. Ouvrez Windows Update en cliquant sur la touche Windows, puis tapez "Windows Update" et cliquez dessus.
  3. Ouvrez une invite de commande en mode administrateur (Touche windows - tapez "cmd" - clic droit sur "invite de commande" - "Exécuter comme administrateur")


  4. Dans l'invite de commande, tapez (mais ne confirmez pas encore avec la touche "entrée"): "wuauclt.exe /updatenow" pour forcer la détection de mises à jour

  5. Dans la fenêtre de windows update cliquez sur "Rechercher des mises à jour" puis cliquez immédiatement sur la touche "entrée" dans la ligne de commande (point 4).


C'est terminé, la mise à jour de Windows 10 commence. Bonne mise à jour ;)


PS: Si windows update ne commence pas le téléchargement de Windows 10, vous devez d'abord installer toutes les mises à jour puis recommencer la procédure.

Wednesday, June 24, 2015

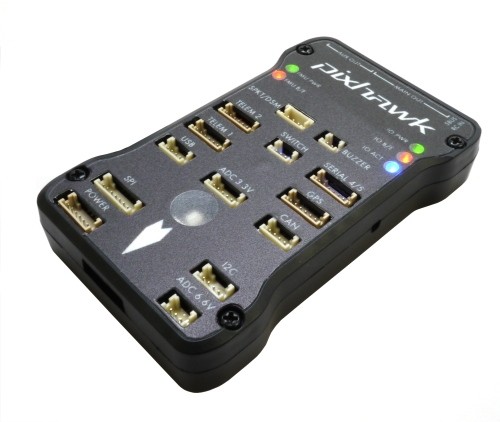
My first drone is (not an hexacopter but) a Q450 quadcopter with 3DR's Pixhawk flight controller

Here's the follow-up of my previous article "Help needed for my FPV hexacopter" .

Thanks to the help of the "Drones in Belgium" community, and a few friends (Benjamin, Dominique, and Maxime), I finally could get out and have my drone flying for the first time.

In a previous article, I asked for help choosing all the components that I would need to build a FPV hexacopter in order to take videos with a GoPro.

My previous article is the entire story about selecting the components and where I bought those but here's a resume:

Ordered in the international warehouse:


Ordered in the EU warehouse:


I have a Spektrum DX6i remote but I finally bought a Taranis FRSSKY X8R (from http://www.gulliver-modeles.fr/) in order to have more channels. It appears to be a very good choice.
3DR's Pixhawk Flight Controller.

Last but not least, I decided to order 3DR's Pixhawk flight controller with the corresponding  3DR GPS uBlox LEA-6 with Compass (from https://www.buildyourowndrone.co.uk).

As recommended by Benjamin, I removed the batteries banana plugs and switched them for XT60 connectors.

Here's a picture of the final result:

After multiple trials to set up my quadcopter with Mission Planner and changing some remote controller settings, thanks to Maxime, I could finally fly for the first time with my own drone.

The day was sunny and with nearly no wind... it was perfect for my first time.

There were a few minor crashes (because of some bad settings and the low-battery alarm that I did not connect correctly) but no damages.

Here is Maxime's video of this day that he took from his own drone.

I want to thank everyone who helped me having this quadcopter flying. Thanks for sharing your knowledge.

Next steps is to mount the GoPro and FPV system... but that's another story ;)

Friday, January 17, 2014

Help needed for my FPV hexacopter components list.

Hi there, I submitted the same post in a French forum but I am  posting here too hoping that you might help me and that it could help other people from the "'Drones in Belgium" G+ community members (or anyone else sharing the same passion).

I want to build a hexacopter but I am a complete newbie in this domain, that's why I would like your help in the selection of components.
UPDATE: I already ordered all I need to fly but not the flight controller and FPV equipment. Your help is still appreciated for this (see bellow).

The H550 v3 Frame with integrated PCB

First, you have to know that:
  • I want to install a GoPro (and do FPV)
  • I have a Spektrum DX6i remote (hacked to have a beautiful backlight) that I complete with a laptop
  • I want stability (for movies)
  • I wish I could schedule Waypoints using Google Maps

My early researches lead me to an arducopter. The searches and feedback brought me to think I would go with the 3D robotics solutions. It also apparead that an hexacopter was not required and a quadcopter even sounds like a better choice for what I want to do.


So, at first, I selected some components at HobbyKing and had to choose for the motors and propellers, I thought that the more kv, the better but I was wrong.

This excellent french post will help you decide which motors and propellers are the best for you.
I dediced to use a 900kv motor and big 10x4.5 slow fly propellers to have a maximum of stability and autonomy. I also thought that big batteries (5000 mah) would be required but 4000 mah seems to be more thn enough and those are lighter.

This is the components list (for a quadcopter) that I finally ordered:


I decided to split the order in two to save on the delivery costs and because the 30 AMP esc where not in stock in Hobbyking's international warehouse.

Ordered in the international warehouse:

Ordered in the EU warehouse:


These components should enable me to fly (knowing that I already have the chargers and a transmitter).

I still have to choose for a flight controller and the FPV equipment. 

I already know that I will need:

  • APM 2.6 Set (external compass). The set includes:
    • APM 2.6+ Assembled (Cables enter from side)
    • APM Power Module with XT60 connector kits
    • 3DR ublox GPS with Compass Kit
  • Or the "3DR Pixhawk" that seems to be the next gen.. with the "3DR GPS uBlox LEA-6 with Compass". 
  • 1 autopilot: the 3DR Pixhawk with
    • 3DR GPS uBlox LEA-6 with Compass
    • 3DR Radio set (433 MHz)
    • Do I need the PPM encoder?

    => Where should I buy this for best pricing (including delivery in Belgium), 3DRobotics?

  • The GoPro 3 (I'll go for the Silver Edition).
Then, for FPV, I will have to add some more components. For this, I will follow NEVdD's list. Thank you for sharing NEVdD...

This includes some components like:
I will also probably buy a Turnigy 9X 9Ch transmitter unless I can add some channels to my existing Spektrum DX6i ?


Would you mind sharing your thoughts about this list?

Thanks for your help!

Wednesday, September 18, 2013

How to replace Parrot AR Drone's battery and protect your house from taking fire.

This post will explain how to protect your house / appartment from damages when charging the Parrot AR drone battery and how to use other batteries.
A friend of mine, Sébastien (@sarbogast), left his AR Drone battery charging for too long.
It sounds like the charger is not detecting when the battery is full and it keeps charging until you remove the battery.
This is really dangerous as the battery could explode.

Here's a picture (taken by Sébastien) of the battery. Hopefully, Sebastien did not need to call the fire fighters.

I then decided to recommend him to use a Lipoly charge bag * when charging his batteries to prevent damages caused by a battery on fire.


* The links provided are for EU residents, you will find the corresponding links for Hobbyking's international warehouse at the end of this post.

You may also use another battery, with higher capacity (meaning more flying time), with your Parrot AR Drone (v1 or v2). I recommended Sebastien to use this Turnigy 1300mAh 3S 20C Lipo Pack:


To be able to use it, you will have to use a cable adapter: Female Mini Tamiya <-> Male XT60 . I've seen people complaining that the cables (red and black) where inverted (reversed polarity) on the female side (Mini Tamiya connector). Make sure to check this before connecting to prevent any damage.

Finally, you may want to buy a better battery charger (like the "Turnigy Accucel-6 50W 6A Balancer")  that will optimize the life of your batteries:


You will need to add a power supply as the charger does not come with one.


These are the links to use for non-EU residents:
All the links are provided to help but they also contain an affiliate code that will allow me to receive a small discount on my next purchase, you won't pay more by using those links.

Monday, September 2, 2013

The IT tip of the day: Chrome has a Task Manager

If you are like me, you are using chrome...

This browser has its own task manager.
This is very useful if you want to know were your memory (RAM) and CPU are used for and what is running in the background. Most of the time, you will see some extensions or caching tools.

To open it, press the shift + esc keys in Chrome.


You will also be able to kill a process by pressing the "End process" button.


Sunday, August 25, 2013

Avast is blocking Hold'em Manager (with PostgreSQL)

As you might know, I am an amateur poker player. Even if I really prefer playing live (because a like seeing other players in order to "read them" and I like to be seen to add some acting to my bluffs), I am also sometimes playing online.

The problem of online poker is that most frequent players have a poker tracker that helps them to detect weaknesses and strengths of their game and of their opponents games. So, if you don't have one, other players have a big advantage... I bought Hold'em Poker Manager 2 and I really think this is a profitable investment if you are playing real money.

Using the latest version of Avast, I had a problem with Hold'em Manager not being able to connect to Postgre's database. The exact message is:
Hold'em Manager 2 cannot connect to the PostgreSQL database server.


The following steps describe how to solve this issue.

First, find the file postmaster.pid in the "data" folder of PostgreSQL, mine was located in C:\postgreSQL\data but it could also be located in your "program files" folder.

Then, rename the file like this: postmaster.pid.bak .

After that, you have to restart the postgreSQL service (name could be different depending on the version you installed).

You may now open Hold'em Manager 2. If Avast shows an alert, you just have to accept the exception.
Problem solved!

Saturday, August 24, 2013

Setting up your personal cloud using a Synology NAS

I am a big fan of Synology NAS (Network Attached Storage).
Those little devices can, of course, serve as file servers but they can also do just about anything you want from a server, at least at home or for small businesses.

Today, I will show you how to configure your Synology to set up your own cloud to sync your files between the NAS and other computers like you would do using Dropbox or Google Drive.

This will allow you to keep your files in a safe place automatically but also to have a same version of your documents across multiple computers.

In order to do this, we will install Synology's Cloud Station package.

First, connect to your Synology's web interface and go to the package center:


Then, browse the "Business" category to install the "Cloud Station" package.


When this is done, you will see a new icon in the main menu, click on it. 
If you can't find the icon, don't panic, just click the "action" button, stop and run. The icon will now be added to the main menu.


The next thing to do is to check the "enable" check box and to click "apply".
As you can read, Cloud station is not able to sync files bigger than 10GB... not a problem for me, I don't have such big files on my computer.

The "Quick Connect" setting allows you to connect easily, without any router configuration, to your NAS. This is not covered by this tutorial but you can have more informations about this here.

In the "privileges" window, select the users who will be allowed to use your Cloud Station and click "save".

In the sharing window, select the shared folders you want to be able to sync and click "save".

In this case, I created the "Xav Cloud" folder via the "control panel - shared folders menu".
If you did not create a folder before, you can do this now and refresh the "Sharing window" by clicking on another window and the going to the "sharing window" again.

Now that your "Cloud Station" server is installed, you have to download the client application for your computer. Go on Synology's website in "the support - downloads" section and select your Synology model to see the list of corresponding software.

Download the "Cloud Station" (there is a version for Windows and one for Mac) client and install.


Once it has been installed, you will see a screen asking for your NAS ip address , your username and password. (sorry the following screen captures are in French but they will look the same).


IMPORTANT: If you want to use your url (like mynas.synology.me) or external ip address, you will have to open and forward the TCP port 6690 to the local IP address of your NAS. This step depends on your router / firewall and is explained on http://portforward.com/. However, if your computer is often connected to the network where your NAS is located, I recommend you to use the ip address.

In the next screen you can change your computer's name that will be displayed in the "Cloud Station" interface of your NAS, and the folder you want to replicate.
By default, the application will create a folder called "Cloud Station" in your user profile. Note that if you want to change the folder, it has to be an empty one.


Click Next and you have finished installing your personal Cloud and the files you will put in the newly created folder will automatically sync with your cloud.

You can install the Cloud Station client app on multiple computers to have the same folder content on all your computers.

Note that, you won't have any other storage limit than the available disk space you have on your NAS or your computer.

What's next?

  1. If you are like me, you have a smartphone... and you will install the "DS Cloud" app using the same IP or url, username and password you already used in order to be able to browse and download your Cloud folder's content on your smartphone...
  2. You can follow my tutorial to install the "Symform Cloud Backup" to backup your folder to an external location and have a maximum of redundancy in case your house was on fire and you lost your computer and your NAS at the same time.

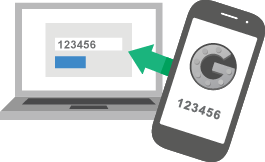
How to secure your Google (or GMail) account using two-factor authentication

A few days ago, my cousin had her Gmail account hacked. The hacker immediately changed her password, recovery questions and mobile number. ...