Wednesday, September 18, 2013

How to replace Parrot AR Drone's battery and protect your house from taking fire.

This post will explain how to protect your house / appartment from damages when charging the Parrot AR drone battery and how to use other batteries.
A friend of mine, Sébastien (@sarbogast), left his AR Drone battery charging for too long.
It sounds like the charger is not detecting when the battery is full and it keeps charging until you remove the battery.
This is really dangerous as the battery could explode.

Here's a picture (taken by Sébastien) of the battery. Hopefully, Sebastien did not need to call the fire fighters.

I then decided to recommend him to use a Lipoly charge bag * when charging his batteries to prevent damages caused by a battery on fire.


* The links provided are for EU residents, you will find the corresponding links for Hobbyking's international warehouse at the end of this post.

You may also use another battery, with higher capacity (meaning more flying time), with your Parrot AR Drone (v1 or v2). I recommended Sebastien to use this Turnigy 1300mAh 3S 20C Lipo Pack:


To be able to use it, you will have to use a cable adapter: Female Mini Tamiya <-> Male XT60 . I've seen people complaining that the cables (red and black) where inverted (reversed polarity) on the female side (Mini Tamiya connector). Make sure to check this before connecting to prevent any damage.

Finally, you may want to buy a better battery charger (like the "Turnigy Accucel-6 50W 6A Balancer")  that will optimize the life of your batteries:


You will need to add a power supply as the charger does not come with one.


These are the links to use for non-EU residents:
All the links are provided to help but they also contain an affiliate code that will allow me to receive a small discount on my next purchase, you won't pay more by using those links.

Monday, September 2, 2013

The IT tip of the day: Chrome has a Task Manager

If you are like me, you are using chrome...

This browser has its own task manager.
This is very useful if you want to know were your memory (RAM) and CPU are used for and what is running in the background. Most of the time, you will see some extensions or caching tools.

To open it, press the shift + esc keys in Chrome.


You will also be able to kill a process by pressing the "End process" button.


Sunday, August 25, 2013

Avast is blocking Hold'em Manager (with PostgreSQL)

As you might know, I am an amateur poker player. Even if I really prefer playing live (because a like seeing other players in order to "read them" and I like to be seen to add some acting to my bluffs), I am also sometimes playing online.

The problem of online poker is that most frequent players have a poker tracker that helps them to detect weaknesses and strengths of their game and of their opponents games. So, if you don't have one, other players have a big advantage... I bought Hold'em Poker Manager 2 and I really think this is a profitable investment if you are playing real money.

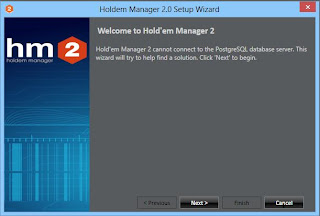
Using the latest version of Avast, I had a problem with Hold'em Manager not being able to connect to Postgre's database. The exact message is:
Hold'em Manager 2 cannot connect to the PostgreSQL database server.


The following steps describe how to solve this issue.

First, find the file postmaster.pid in the "data" folder of PostgreSQL, mine was located in C:\postgreSQL\data but it could also be located in your "program files" folder.

Then, rename the file like this: postmaster.pid.bak .

After that, you have to restart the postgreSQL service (name could be different depending on the version you installed).

You may now open Hold'em Manager 2. If Avast shows an alert, you just have to accept the exception.
Problem solved!

Saturday, August 24, 2013

Setting up your personal cloud using a Synology NAS

I am a big fan of Synology NAS (Network Attached Storage).
Those little devices can, of course, serve as file servers but they can also do just about anything you want from a server, at least at home or for small businesses.

Today, I will show you how to configure your Synology to set up your own cloud to sync your files between the NAS and other computers like you would do using Dropbox or Google Drive.

This will allow you to keep your files in a safe place automatically but also to have a same version of your documents across multiple computers.

In order to do this, we will install Synology's Cloud Station package.

First, connect to your Synology's web interface and go to the package center:


Then, browse the "Business" category to install the "Cloud Station" package.


When this is done, you will see a new icon in the main menu, click on it. 
If you can't find the icon, don't panic, just click the "action" button, stop and run. The icon will now be added to the main menu.


The next thing to do is to check the "enable" check box and to click "apply".
As you can read, Cloud station is not able to sync files bigger than 10GB... not a problem for me, I don't have such big files on my computer.

The "Quick Connect" setting allows you to connect easily, without any router configuration, to your NAS. This is not covered by this tutorial but you can have more informations about this here.

In the "privileges" window, select the users who will be allowed to use your Cloud Station and click "save".

In the sharing window, select the shared folders you want to be able to sync and click "save".

In this case, I created the "Xav Cloud" folder via the "control panel - shared folders menu".
If you did not create a folder before, you can do this now and refresh the "Sharing window" by clicking on another window and the going to the "sharing window" again.

Now that your "Cloud Station" server is installed, you have to download the client application for your computer. Go on Synology's website in "the support - downloads" section and select your Synology model to see the list of corresponding software.

Download the "Cloud Station" (there is a version for Windows and one for Mac) client and install.


Once it has been installed, you will see a screen asking for your NAS ip address , your username and password. (sorry the following screen captures are in French but they will look the same).


IMPORTANT: If you want to use your url (like mynas.synology.me) or external ip address, you will have to open and forward the TCP port 6690 to the local IP address of your NAS. This step depends on your router / firewall and is explained on http://portforward.com/. However, if your computer is often connected to the network where your NAS is located, I recommend you to use the ip address.

In the next screen you can change your computer's name that will be displayed in the "Cloud Station" interface of your NAS, and the folder you want to replicate.
By default, the application will create a folder called "Cloud Station" in your user profile. Note that if you want to change the folder, it has to be an empty one.


Click Next and you have finished installing your personal Cloud and the files you will put in the newly created folder will automatically sync with your cloud.

You can install the Cloud Station client app on multiple computers to have the same folder content on all your computers.

Note that, you won't have any other storage limit than the available disk space you have on your NAS or your computer.

What's next?

  1. If you are like me, you have a smartphone... and you will install the "DS Cloud" app using the same IP or url, username and password you already used in order to be able to browse and download your Cloud folder's content on your smartphone...
  2. You can follow my tutorial to install the "Symform Cloud Backup" to backup your folder to an external location and have a maximum of redundancy in case your house was on fire and you lost your computer and your NAS at the same time.

Friday, August 23, 2013

Testing Symform: A "free" peer-to-peer cloud backup solution.

Today I wanted to test Symform, a free cloud backup solution.

You can try their solution for free with 10GB of storage and you can get unlimited storage "for free" by sharing your unused disk space at the ratio of 2:1. So, if you give 2GB of disk space, you will receive 1 GB to backup your files.

Your backups are encrypted and fragmented across multiple locations (to which you are contributing if you want more than 10GB of backup space) so that your data is safe and unavailable to other users.

The solution is available for download here and you can install it on Windows, Mac, Linux, and some of the most used NAS (Network Attached Solution).

This article will share my experience on installing the solution on my Synology NAS.

First, connect to your Synology's web interface and go to the package center:
Then browse the "backup" category and install the "Symform Cloud Backup" package.

Once installed, you will get a new icon in the main menu.

There, you have to type in your email address, sign in and then type your user infos and choose a strong password (I recommend using at least 8 characters with at least an uppercase letter, a number and a special character like "!, @...").

You will then see the End User License Agreement that you should read and accept:

You will then have to follow five steps setup up your cloud backup.

Step 1: Name your device
In this screen, you have to choose a device name and indicate a location (recommended in case you might use multiple devices). Then the first checkbox is use if you want to save folders to the cloud and the second one is used if you want to share some disk space in order to get some free space (at the ration of 2:1 like explained before).

Step 2: Configure the environment (bandwidth and planning)
The bandwidth (the maximum data transfer rate you of a network or Internet connection) is your internet connection speed. Upload is the speed at which you are sending data and download is the opposite.
You can use "http://www.speedtest.net/" to check your actual connection speed.

The business hours and day are used to determine the best time to transfer data. It will minimize the bandwidth usage during your business hours. If you use it at home, define the business hours as the time you are awake and at home.

Step 3: Select the local Folders
This screen allows you to select the folders you want to backup.
Click on "Add local Folder to Sync with Cloud" and then browse the folder you want to backup.
Repeat this step for each folder you want to save.

When finished, click on "Step 4 Contribution"

Step 4:  Contribution
The following screen allows you to select a folder for the disk space you are giving to the cloud ( in order to get some extra cloud storage space): Leave the default in "contribution folder location" or choose another folder.

Then, in "Communication" you can see the port number to open and forward to your Synology NAS, leave or change the default port number then open and forward it. This step depends on your router / firewall and is explained on http://portforward.com/.
Once you have opened and forwarded the port to your NAS local ip address, click the "test open port button". If you did well, you should now see this:
Go to...

Step5: Bandwidth
Bandwidth Sharing: This defines the bandwidth that Symform can use. You can update it or leave the default values that I find acceptable.


Contributed Storage Space: This defines the amount of local storage space you give to Symform. As already explained, you give 2, your receive 1. So if you need 20GB to backup your files, you need 10 more GB (as you are receiving 10GB for free). So, you need to set this value to, at least, 10GB x 2 = 20GB.
You can see how much space you have left after "Amount of excess disk space on the device".

Once you're done, click "Finish" and you will see a summary of your settings: Name and location, Bandwidth usage and folders.

Congrats! Your cloud backup is now up and running.

When you click OK, the system will  start sending your files to the cloud:


You might want to connect to Symform's website in order to see more details about your account using the credentials you created at the beginning of this tutorial or you can simply click on the "Cloud Dashboard" link at the upper right of the window.

Note that you should have a big or an unlimited traffic volume included in your internet subscription as this could generate a high volume (at least during the first synchronization).

x-editable, not yet compatible with Twitter Bootstrap 3.0

x-editable allows you to do some in-place editing in you web pages or web apps that are using JQuery.
It is really useful if you want to render those more user-friendly.


Twitter Bootstrap is a well known front-end framework. Version 3.0 has been published this week with some good improvements and they switched to "Flat" design.

Sadly, x-editable is not yet compatible with this version of Bootstrap. At least, the pop-up mode is not working. If you still want to use x-editable but can't wait to upgrade to version 3.0 of Bootstrap, you will have to switch all your inputs to "inline" mode:
$.fn.editable.defaults.mode = 'inline';

Thursday, August 22, 2013

Installation et configuration d'Asterisk sur un nas Synology

Asterisk est un projet open source de VOIP (téléphonie sur IP).

Synology est la marque d'un fabriquant de NAS (Network attached storage) que je vous recommande vivement si vous cherchez une solution de stockage en réseau, pour vos documents, photo, vidéos... Il vous permet également de remplacer efficacement un client torrent, un serveur FTP, un serveur VPN, un serveur multimedia, etc...

J'ai contribué il y a quelques temps à la rédaction d'un tutoriel pour l'installation d'un central Asterisk sur les NAS Synology, vous pouvez le retrouvez ici: http://syno.haeflinger.com/index.php/Installation_et_configuration_d'Asterisk_sur_Syno

Depuis la rédaction de ce tutoriel, il est maintenant possible d'installer un paquet Asterisk, sans passer par cette procédure, sur les modèles récents de Synology (DSM 4.2).

Less is more!

This is my first blog post.

I never thought I would create my own blog but during a small discussion I had at home with a friend this evening, I decided to give it a try... This friend is Martin Melchior and, if you are in love with electronics or photography, you should visit his blog: http://www.martinmelchior.be/.

While we were discussing, I realized that I already met a lot of situations where I had to look after a tutorial, where I did something that other people could find interesting too, or just where I might want to share something... This is why I'm posting this first article.

So, I decided to create this blog on Blogger because as Martin said, Google tends to promote its own products and it my help for a better ranking in Google Search.

As I wanted to create a blog, a began checking Blogger's suggested themes... but then I remembered a sentence that you might have already heard:

Less is more!
In this case I tried to apply it to this blog's design as I didn't want to include a lot of background effects, animated pictures, complicated fonts... I just decided to have a dark background because I find it easier to read and I used an online tool to select my fonts colors: http://colorschemedesigner.com/


It is easy to use: you simply type one hexadecimal color code and it will give you other color codes that are compatible with the one you selected. It is really useful when you're designing a website template or a web application theme.

In this blog I decided to use a dark background, a white standard font (Courier) that is compatible with just any device and light blue links.

I hope you will find this blog comfortable to read like this.

How to secure your Google (or GMail) account using two-factor authentication

A few days ago, my cousin had her Gmail account hacked. The hacker immediately changed her password, recovery questions and mobile number. ...